

Writing... at last! It has been over three months since the
last post on this blog, and weekly weaves
has almost become quarterly weaves. That will no longer be however, though I have enjoyed the break. I will report on my recent creative
endeavours in the next few weeks, of which there are many. Meanwhile, here is an ‘instructible’ for
a forthcoming project at the Festival of Thrift taking place this September in Darlington.

Commissioned through Home Live Art, the project involves creating an architecturally sized sculptural
installation, stitched between trees and buildings at Lingfield Point. The stitching will provide a framework for hanging woven objects made by visitors at the festival, using locally sourced natural materials and green waste combined with yarn.
The instructible below which should take about 5 to 10 minutes to make is one idea
of several in development, for objects that could be produced by visitors to furnish the
installation. The technique introduced here is twining, probably the oldest form of basketry and a skill related to what lead to the advent of the first baskets and buildings
made by man. For more info see this previous post as well as others on this blog inspired by hedgerow basketry.
Whether the objects to be produced end up being templates for hanging baskets, bird feeders or simply decorations, the making of
these by some of the 27,000 visitors expected at the festival (!) should be fun, entertaining, inspiring and bring home the fact that most of the stuff that surrounds you, including the growing varieties, can be used creatively.
So, why not give it a go and come
prepared to the festival by making one or several of these to add to the display. There will be more instructibles posted here very soon. Keep your
eyes peeled!

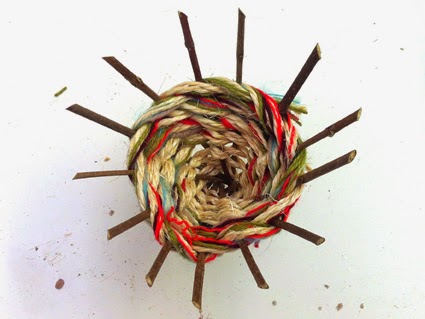
Recipe
To make a twined construction as those illustrated above, you’ll need 10/12 sticks, secateurs (optional), multi coloured string or yarn, an elastic band,
a crochet hook (optional) and a pair of scissors.

Cut all the sticks to an equal
length, approximately 12 inches / 30cm. Bundle them up using the elastic band making sure to arrange tips (thin
ends) on one side and butts (fat ends) on the other. Try use sticks of similar thickness if you can.

Cut a 1/1.5m length of string/yarn. With the tips at the bottom, fold the length in half and loop over one stick as illustrated above.

Bring the length of string on the right hand side of the stick over the front and loop over the back of the next one on its left. You are now twining!

Twine around all the sticks repeating this process. These instructions by the way will mostly suit left-handed people like me, that is twining round the bundle in a clockwise
direction. If you are right handed, try reverse the direction you are working in,
i.e. twining anti-clockwise.

Notice that as you twine the
sticks will want to twist in one direction with the sticks coming apart. Allow this to happen freely. The wider the gaps, the wider the opening of the 'basket' you are making
will be.

Notice also that one or several sticks will naturally find themselves in the middle as you have twined a full circle round the bundle. It’s up to you whether you want to weave these in by twining around them in between other sticks or remove them.

As the gaps get bigger, add more yarn as illustrated above to fill these in.

To finish, trim the yarn on the right hand side of the last stick have worked one inch from the weave.

Thread the remaining bunch underneath the last round of twining using a crochet hook if you have one. If not, prise the weave apart using fingers to hook the yarn through and trim 1 inch from the weave.


Last, cut the sticks at the top and
bottom.
Et voila! Job done!